Fire in Assembly: A Tiny DOS Fire Effect
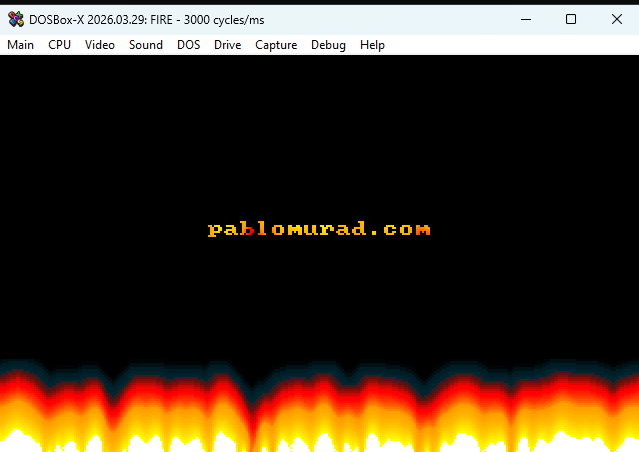
I created this project as a small experiment in old-school graphics programming using 16-bit x86 Assembly. The program runs as a DOS .COM executable and renders a classic fire effect in VGA mode 13h, the famous 320x200 graphics mode with 256 colors.
Repository: https://github.com/runawaydevil/fire-asm
The goal was not to build something practical in the modern sense. This is not a Windows GUI program, not a Linux terminal program, and not something meant to run directly in PowerShell. It is a tiny real-mode DOS program that talks directly to BIOS interrupts, VGA memory, and I/O ports.
That is exactly what makes it interesting.
A DOS .COM Program #
The file starts with:
1org 0x100       ; For .com file.
2;org 0x7c00      ; For MBR.
The org 0x100 directive tells NASM that this program is meant to be loaded as a DOS .COM file. In DOS, .COM programs are loaded at offset 0x100, because the first 256 bytes of the segment are reserved for the Program Segment Prefix.
There is also a commented alternative:
1;org 0x7c00 ; For MBR.
That is for a boot-sector style version. A boot sector is loaded at memory address 0x7C00, which is why that origin would be used for an MBR experiment. In this project, though, I am using the safer and simpler .COM format. The MBR-related padding and boot signature are also commented out at the end of the file:
1;times (510 - ($ - $$)) db 0      ; Pad to 510 bytes
2;db 0x55                          ; MBR boot signature.
3;db 0xaa
Entering VGA Mode 13h #
The first real action is switching the display into VGA mode 13h:
1mov ax, 0x13
2int 0x10
BIOS interrupt int 0x10 handles video services. By placing 0x13 in AX, I ask the BIOS to switch the machine into graphics mode 13h.
Mode 13h gives me:
- 320 pixels wide
- 200 pixels tall
- 256 colors
- 1 byte per pixel
- a linear framebuffer at segment
0xA000
That last part is the fun part. Since each pixel is just one byte, drawing becomes very direct: write values into memory, and pixels appear on the screen.
Setting Segment Registers #
After switching video mode, the program makes sure DS and ES point to the same segment as the code:
1push cs
2push cs
3pop ds
4pop es
In 16-bit real mode, segment registers matter a lot. Code, data, and video memory are addressed through segment:offset pairs. Since the message string and palette data are stored inside the same binary as the code, I need DS and ES to point to the program segment before reading from them.
Writing Text to the Screen #
Before the fire animation starts, the program writes a small message:
1mov ax, 0x1300
2mov bx, 0xf
3mov cx, (msg_end - msg)
4mov dx, ((10 << 8) + (40 / 2 - (msg_end - msg) / 2))
5mov bp, msg
6int 0x10
The message itself is:
1msg: db 'www.hanshq.net/fire.html'
2msg_end:
This uses BIOS video interrupt int 0x10, function AH=13h, which writes a string to the screen.
The interesting part is this expression:
1(msg_end - msg)
This computes the length of the string at assembly time. Instead of hardcoding the number of characters, the code lets NASM calculate it from the labels.
This part:
1((10 << 8) + (40 / 2 - (msg_end - msg) / 2))
packs the row and column into DX. The high byte DH stores the row, and the low byte DL stores the column. The code places the message around row 10 and horizontally centers it based on its length.
Programming the Fire Palette #
A fire effect depends heavily on color. The program defines a custom palette:
1firepal:
2        db     0,   0,   0,   0,   1,   1,   0,   4,   5,   0,   7,   9
3        db     0,   8,  11,   0,   9,  12,  15,   6,   8,  25,   4,   4
4        db    33,   3,   3,  40,   2,   2,  48,   2,   2,  55,   1,   1
5        db    63,   0,   0,  63,   0,   0,  63,   3,   0,  63,   7,   0
6        ; ...
7firepal_end:
The values are VGA DAC color values. Each color uses three bytes: red, green, and blue. VGA DAC channels use values from 0 to 63, not 0 to 255.
The palette is loaded using direct I/O port access:
1cli
2mov dx, 0x3c8
3xor al, al
4out dx, al
5inc dx
6mov cx, (firepal_end - firepal)
7mov si, firepal
Port 0x3C8 selects the starting DAC color index. Port 0x3C9, reached after inc dx, receives the actual RGB values.
Then the program writes the palette:
1setpal1:
2        lodsb
3        out dx, al
4        loop setpal1
After the defined palette ends, the remaining palette entries are filled with maximum intensity:
1mov al, 63
2mov cx, (256 * 3 - (firepal_end - firepal))
3setpal2:
4        out dx, al
5        loop setpal2
So the palette starts dark, passes through red and orange tones, then eventually reaches white heat.
The use of cli and sti disables and re-enables interrupts while programming the palette:
1cli
2; ...
3sti
That is a very low-level detail, and it shows what kind of environment this program expects: real-mode DOS-style execution, not a protected modern OS process.
Copying the Framebuffer into a Scratch Buffer #
The fire is not computed directly on the visible framebuffer. Instead, the code creates a scratch buffer in memory.
First, it sets DS to video memory:
1push 0xa000
2pop ds
Then it sets ES to a buffer located 0x1000 paragraphs after the program segment:
1push cs
2pop ax
3add ax, 0x1000
4mov es, ax
Then it copies the current screen into that scratch buffer:
1xor si, si
2xor di, di
3mov cx, (320 * 200 / 2)
4cld
5rep movsw
Since movsw copies words, each iteration copies two bytes. The screen has 320 * 200 = 64000 bytes, so the loop runs 320 * 200 / 2 times.
This is a classic optimization: copy two bytes at a time instead of one.
Generating the Bottom Row #
The fire begins at the bottom of the screen. The program writes random intensity values into the bottom row:
 1mov cx, 320
 2xchg bp, ax
 3bottomrow:
 4        imul ax, 181
 5        add ax, 359
 6        xchg al, ah
 7        stosb
 8        xchg ah, al
 9        loop bottomrow
10xchg ax, bp
This is a small pseudo-random number generator based on:
1x = 181 * x + 359
The code uses the high byte of AX as the random-looking value:
1xchg al, ah
2stosb
3xchg ah, al
stosb stores one byte at the address pointed to by ES:DI.
This bottom row acts as the heat source. Bright random values at the bottom become the fuel that gets blurred and cooled upward.
Propagating the Fire Upward #
The core of the effect is here:
 1mov cx, (320 * 50)
 2mov si, di
 3add si, 320
 4propagate:
 5        xor ax, ax
 6        mov al, [si]
 7        add al, [si - 1]
 8        adc ah, 0
 9        add al, [si + 1]
10        adc ah, 0
11        add al, [si + 320]
12        adc ah, 0
13        imul ax, 15
14        shr ax, 6
15        stosb
16        dec si
17        loop propagate
For each pixel, the program looks at several pixels below it:
1[si]
2[si - 1]
3[si + 1]
4[si + 320]
That means:
- pixel below
- pixel below-left
- pixel below-right
- pixel two rows below
Then it combines those values, multiplies by 15, and divides by 64 using a right shift:
1imul ax, 15
2shr ax, 6
This does two things at once:
- It averages the nearby heat values.
- It cools the result slightly.
That is the whole fire illusion. Heat starts at the bottom, gets averaged upward, and loses intensity as it rises.
The algorithm is simple, but visually effective. It is the same general idea used in many classic demo scene fire effects.
Why the Code Works Backwards #
Inside the main loop, the code sets the direction flag:
1std
This makes string operations like stosb decrement the index register instead of incrementing it.
Then it starts from the end of the buffer:
1mov di, (320 * 200 - 1)
So the program processes pixels backwards through the framebuffer.
Later, before copying the final image, it clears the direction flag again:
1cld
This matters because rep movsw expects to copy forward. Forgetting to clear the direction flag would cause nasty memory-copy bugs.
This is one of those Assembly details that looks tiny but can completely break a program.
Mirroring Fire Onto the Text #
The program also mirrors part of the fire effect onto the text area:
1mov dx, 15
2mov di, (90 * 320)
3mov si, (178 * 320)
Then it loops over rows and pixels:
 1mirrorouter:
 2        mov cx, 320
 3mirrorinner:
 4        mov al, [di]
 5        test al, al
 6        lodsb
 7        jnz mirrorwrite
 8        xor al, al
 9mirrorwrite:
10        stosb
11        loop mirrorinner
12        add si, 640
13        dec dx
14        jnz mirrorouter
The key idea is this:
1test al, al
2; ...
3jnz mirrorwrite
4xor al, al
If the destination pixel is non-zero, it keeps the incoming fire value. If the destination pixel is zero, it writes zero.
That means the fire only appears where something already exists in the destination area, creating a kind of glowing reflection or flame overlay on the text.
Frame Timing #
To avoid running as fast as the CPU allows, the program waits for one BIOS timer tick:
1xor ax, ax
2int 0x1a
3mov bx, dx
4sleeploop:
5        xor ax, ax
6        int 0x1a
7        cmp dx, bx
8        je sleeploop
BIOS interrupt int 0x1A reads the system timer tick count. The code waits until the tick value changes.
A DOS timer tick happens about 18.2 times per second, so this gives the animation a simple frame delay.
It is crude, but very appropriate for this kind of program.
Copying the Frame to VGA Memory #
After calculating the frame in the scratch buffer, the program copies it to real video memory:
1cld
2push 0xa000
3pop es
4mov cx, (320 * (200 - 3) / 2)
5xor si, si
6mov di, (320 * 3)
7rep movsw
Again, video memory starts at segment 0xA000 in mode 13h.
The destination starts at:
1mov di, (320 * 3)
This scrolls the copied image down by three rows. The comment explains why:
1; Scroll down three rows to avoid noisy pixels.
This is a small visual cleanup trick.
Exiting Cleanly #
The program checks for a key press:
1mov ah, 1
2int 0x16
3jz mainloop
BIOS interrupt int 0x16 handles keyboard input. Function AH=1 checks whether a key is available. If no key is pressed, the program jumps back to the main animation loop.
When a key is pressed, it consumes the key:
1xor ah, ah
2int 0x16
Then it restores text mode:
1mov ax, 0x3
2int 0x10
Finally, it exits through DOS:
1mov ax, 0x4c00
2int 0x21
This is the correct DOS-style way to terminate a .COM program.
How to Build and Run It on Windows #
Because this is a DOS real-mode program, it should not be run directly in PowerShell. PowerShell is only used to assemble the source code and launch the emulator.
You need two tools:
- NASM, to assemble the code
- DOSBox-X, to run the DOS
.COMprogram
Install them with winget:
1winget install -e --id NASM.NASM
2winget install -e --id joncampbell123.DOSBox-X
After installing, close and reopen PowerShell so the updated PATH is loaded.
Then go to the project folder:
1cd C:\Users\pablo\Downloads\asm
Assemble the source file:
1nasm -f bin .\fire.asm -o .\fire.com
The -f bin option tells NASM to output a flat binary. That is important because a DOS .COM file is not a modern executable format with headers and sections. It is basically raw machine code loaded into memory at offset 0x100.
Then run it with DOSBox-X:
1dosbox-x -c "mount c `"$($PWD.Path)`"" -c "c:" -c "fire.com"
This command does three things:
1-c "mount c `"$($PWD.Path)`""
Mounts the current PowerShell directory as drive C: inside DOSBox-X.
1-c "c:"
Switches to that mounted drive.
1-c "fire.com"
Runs the program.
Press any key to exit the fire animation.
Troubleshooting #
If PowerShell says:
1nasm: The term 'nasm' is not recognized
then NASM is either not installed or not in your PATH.
First try closing and reopening PowerShell.
Then test:
1nasm -v
If it still fails, find nasm.exe manually:
1Get-ChildItem "C:\Program Files", "C:\Program Files (x86)", "$env:LOCALAPPDATA" `
2  -Recurse -Filter nasm.exe -ErrorAction SilentlyContinue |
3  Select-Object -First 10 FullName
If you find something like:
1C:\Program Files\NASM\nasm.exe
you can run it directly:
1& "C:\Program Files\NASM\nasm.exe" -f bin .\fire.asm -o .\fire.com
If DOSBox-X is not recognized, close and reopen PowerShell as well, then test:
1dosbox-x
Why This Cannot Run Directly in PowerShell #
This code uses instructions and interrupts like:
1int 0x10
2int 0x16
3int 0x1a
4int 0x21
5out dx, al
These belong to BIOS, DOS, or direct hardware-style programming.
Modern Windows does not let normal programs call BIOS interrupts or directly write to VGA hardware ports. Also, 64-bit Windows does not run 16-bit DOS programs natively.
That is why DOSBox-X is necessary. It emulates the old PC environment that this program expects.
What I Learned #
This project is small, but it touches a lot of low-level concepts:
- real-mode x86 Assembly
- DOS
.COMprogram layout - VGA mode 13h
- direct framebuffer access
- BIOS video and keyboard interrupts
- VGA palette programming
- pseudo-random number generation
- pixel propagation algorithms
- timing through BIOS ticks
- manual memory copying
The fire effect itself is not magic. It is just a buffer of intensity values, a random heat source at the bottom, and a cooling average that moves upward. But that simplicity is exactly what makes it beautiful.
A few lines of Assembly are enough to create something animated, visual, and alive-looking.
This is why I like projects like this: they strip programming down to the machine. No engine, no framework, no window manager, no graphics API. Just registers, memory, pixels, and timing.
Suggested Repository Structure #
For the GitHub repository, I would use something like this:
1fire-asm/
2├── README.md
3├── fire.asm
4└── media/
5    └── fire-demo.gif